HomeCloud에 사용할 새 미니PC를 장만하고, Proxmox VE를 설치하고 ISO 파일을 전송하는데 엄청 느립니다. 그래서 문제 생긴 김에 확인과정에서 사용했던 방법 정리해 봤습니다.
Proxmox VE 연결 속도
Proxmox VE 쪽의 물리 네트워크 카드 연결 속도는 Web UI로 확인할 수 없습니다.
CLI에서 ethtools 명령으로 확인해야 합니다.
- Speed : 이 부분에 나오는 속도가 현재 연결된 속도입니다.
- Duplex : Full이 이상적인 상태입니다.
Speed 값이 정상적으로 안나오면 다음과 같은 조치를 해볼 수 있습니다.
- LAN 케이블 뺏다 다시 껴보기 : 접촉 불량, 협상 문제 등 해소 가능
- LAN 케이블 교체 : 케이블 불량 문제 해소
- 스위치 포트 교체 : 스위치의 해당 포트 불량 문제 해소
- LAN 카드 교체 : LAN 카드 포트의 불량 문제 해소
root@pve-h01:~# ethtool enp1s0
Settings for enp1s0:
        Supported ports: [ TP    MII ]
        Supported link modes:   10baseT/Half 10baseT/Full
                                100baseT/Half 100baseT/Full
                                1000baseT/Full
                                2500baseT/Full
        Supported pause frame use: Symmetric Receive-only
        Supports auto-negotiation: Yes
        Supported FEC modes: Not reported
        Advertised link modes:  10baseT/Half 10baseT/Full
                                100baseT/Half 100baseT/Full
                                1000baseT/Full
                                2500baseT/Full
        Advertised pause frame use: Symmetric Receive-only
        Advertised auto-negotiation: Yes
        Advertised FEC modes: Not reported
        Link partner advertised link modes:  10baseT/Half 10baseT/Full
                                             100baseT/Half 100baseT/Full
                                             1000baseT/Full
                                             2500baseT/Full
        Link partner advertised pause frame use: Symmetric Receive-only
        Link partner advertised auto-negotiation: Yes
        Link partner advertised FEC modes: Not reported
        Speed: 2500Mb/s
        Duplex: Full
        Auto-negotiation: on
        master-slave cfg: preferred slave
        master-slave status: slave
        Port: Twisted Pair
        PHYAD: 0
        Transceiver: external
        MDI-X: Unknown
        Supports Wake-on: pumbg
        Wake-on: d
        Link detected: yes
root@pve-h01:~#
Windows 연결 속도
보통 뭔가 새로 설치하면 새로 설치한 제품의 문제로 생각하기 쉽습니다. 그래서 새로 설치한 쪽만 이것저것 확인하다 늪으로 빠지는 경우가 많습니다. 제 경우도 Windows 데스크탑 쪽 문제 였습니다.
통신 문제는 항상 연결 경로 상의 모든 부위를 다 확인해야 결론이 나옵니다.
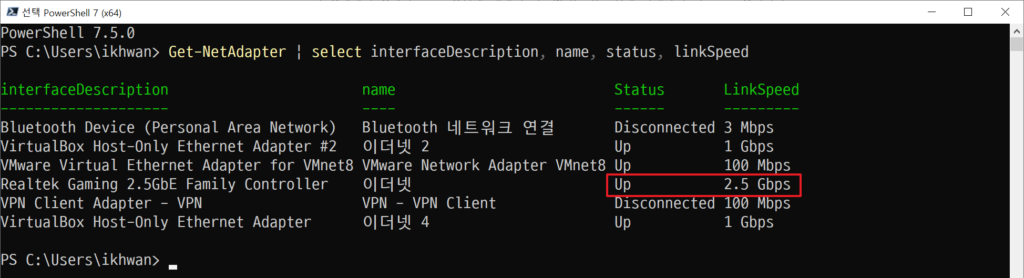
Windows 에서는 PowerShell에서 다음 명령어로 간단하게 확인해 볼 수 있습니다.
Get-NetAdapter | select interfaceDescription, name, status, linkSpeed
그러면 그림과 같은 결과가 나오고, Status가 Up인지 그리고 LinkSpeed가 최대 속도로 잘 나오는지 확인합니다.
실제 전송 속도 확인
iperf3 를 이용하면 Proxmox VE와 Windows 간에 실제 데이터 전송 속도를 확인해볼 수 있습니다.
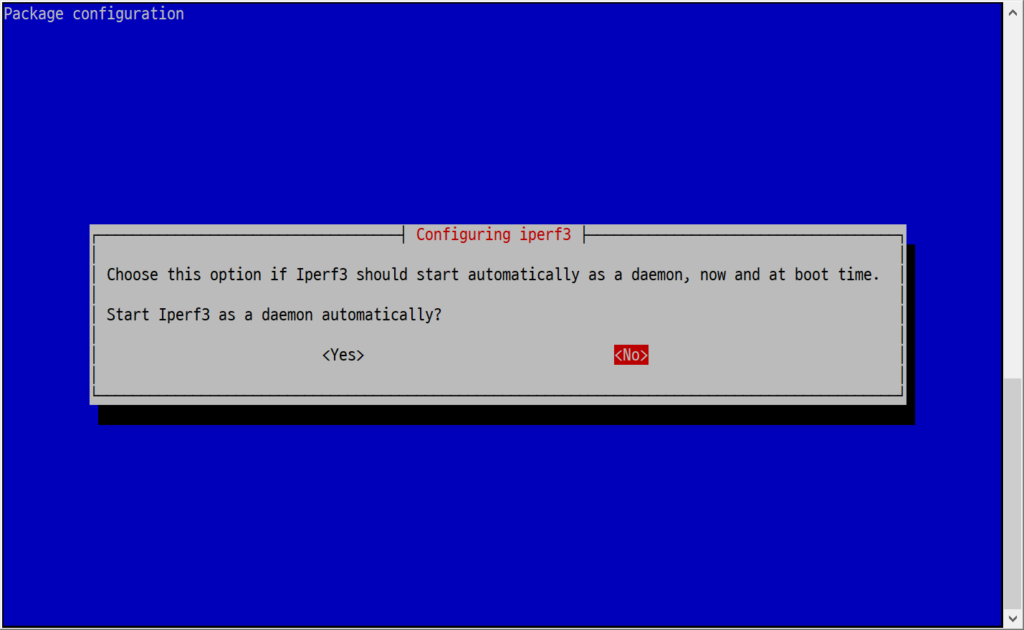
Proxmox VE에서 apt install -y iperf3 명령으로 iperf3을 설치해줍니다. 설치 중간에 그림과 같은 화면이 나옵니다. 굳이 데몬으로 띄울 필요는 없습니다. No가 선택된 상태에서 엔터를 누릅니다.
설치가 끝난 다음 iperf3 -s 명령으로 대기시켜 놓습니다.
root@pve-h01:~# iperf3 -s
-----------------------------------------------------------
Server listening on 5201 (test #1)
-----------------------------------------------------------
Windows 용은 https://github.com/ar51an/iperf3-win-builds 에 접속한 다음, release 링크를 클릭합니다.
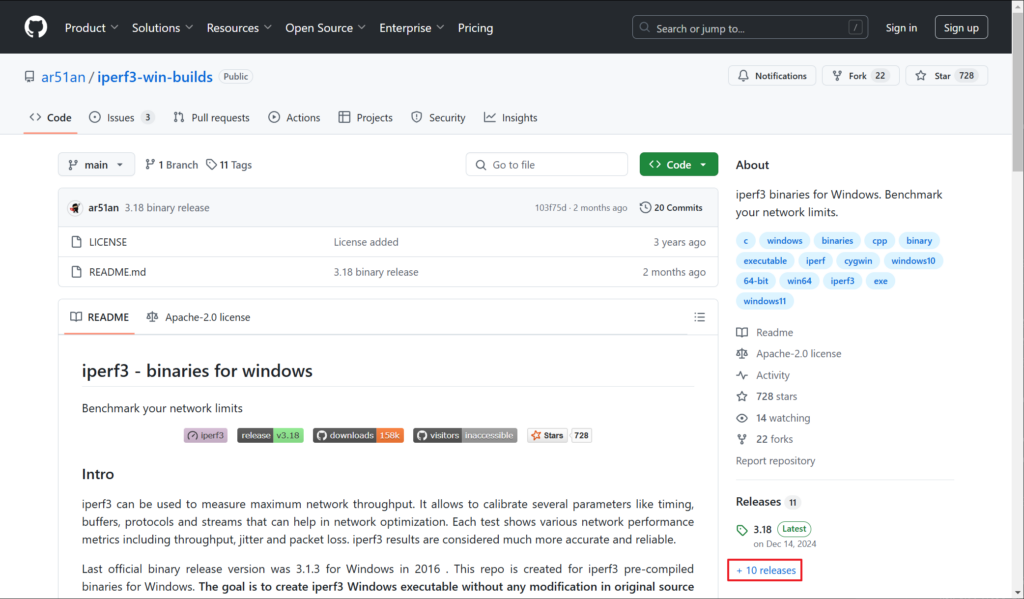
그러면 Releases 목록이 나오고, win64로 끝나는 파일을 다운로드 받습니다. 이 예에서는 iperf-3.18-win64.zip 파일을 받았습니다.

다운로드 받은 파일의 압축을 풀어줍니다.
명령 프롬프트 창을 열고, 압축을 푼 디렉토리로 이동해서 iperf3 -c 서버IP주소 과 같이 입력해서 실행시킵니다.
그림과 같이 Windows, Proxmox VE 양쪽 모두 속도가 표시되면서 테스트가 진행됩니다.
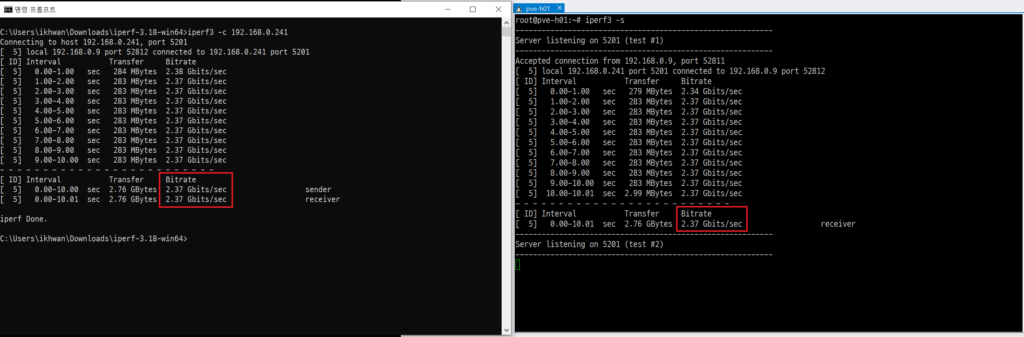
여기서 Bitrate가 네트워크 연결 속도(Link Speed)에 근접하는 값이 나오는지 확인합니다. 전송 효율 때문에 완전히 똑 같은 값은 안나옵니다 ^^
테스트가 끝났으면 Proxmox VE쪽 iperf3에서 Ctrl-C 키를 눌러서 iperf3을 종료합니다.
root@pve-h01:~# iperf3 -s
-----------------------------------------------------------
Server listening on 5201 (test #1)
-----------------------------------------------------------
Accepted connection from 192.168.0.9, port 52811
[  5] local 192.168.0.241 port 5201 connected to 192.168.0.9 port 52812
[ ID] Interval           Transfer     Bitrate
[  5]   0.00-1.00   sec   279 MBytes  2.34 Gbits/sec
[  5]   1.00-2.00   sec   283 MBytes  2.37 Gbits/sec
[  5]   2.00-3.00   sec   283 MBytes  2.37 Gbits/sec
[  5]   3.00-4.00   sec   283 MBytes  2.37 Gbits/sec
[  5]   4.00-5.00   sec   283 MBytes  2.37 Gbits/sec
[  5]   5.00-6.00   sec   283 MBytes  2.37 Gbits/sec
[  5]   6.00-7.00   sec   283 MBytes  2.37 Gbits/sec
[  5]   7.00-8.00   sec   283 MBytes  2.37 Gbits/sec
[  5]   8.00-9.00   sec   283 MBytes  2.37 Gbits/sec
[  5]   9.00-10.00  sec   283 MBytes  2.37 Gbits/sec
[  5]  10.00-10.01  sec  2.99 MBytes  2.37 Gbits/sec
- - - - - - - - - - - - - - - - - - - - - - - - -
[ ID] Interval           Transfer     Bitrate
[  5]   0.00-10.01  sec  2.76 GBytes  2.37 Gbits/sec                  receiver
-----------------------------------------------------------
Server listening on 5201 (test #2)
-----------------------------------------------------------
^Ciperf3: interrupt - the server has terminated
root@pve-h01:~#


