수 많은 PC에 LAN 카드가 달려 있고, 꽃게라는 애칭이 붙은 Realtek사의 LAN 칩을 사용하고 있다.

그러나 안타깝게도 ESXi에서는 Realtek사의 LAN 칩을 지원하지 않는다.
그러다 ESXi 5.5 시절에 어떤 용자께서 Realtek LAN 칩세트용 네트워크 드라이버를 만들었다. 다행히 6.7 최신버전에서도 잘 동작하고 있다. 그래서 6.7은 이것을 ISO 파일에 통합하고 사용할 수 있다.
안타깝게도 ESXi 7.0에서는 이것도 동작하지 않는다. Realtek LAN 카드를 사용해야한다면, 현재로서는 6.x 대를 사용하는 방법 밖에 없다.
다행인 점은 일반 사용자 입장에서 보면 6.7과 7.0의 차이가 그리 크지는 않는 점이다. 보드에 Realtek LAN이 달려 있다면 그냥 맘 편히 6.7 쓰자 ^^;
이미 앞서 많은 블로거 분들이 정리해 놓았지만, “ESXi에서 알아야할 101가지”를 정리하면서 참고자료 형태로 정리하고자 한다.
Ikhwan.Koo
네트워크 카드가 없으면 어떤일이 생기나?
네트워크 카드가 뭐가 중요하다고 생각될 수도 있다. 다만, ESXi는 본체에 연결된 키보드/모니터를 이용하지 않고, 네트워크로 원격에 접속해서 사용해야 한다. 그런데 네트워크 카드가 없으면 어떻게 연결한단 말인가?
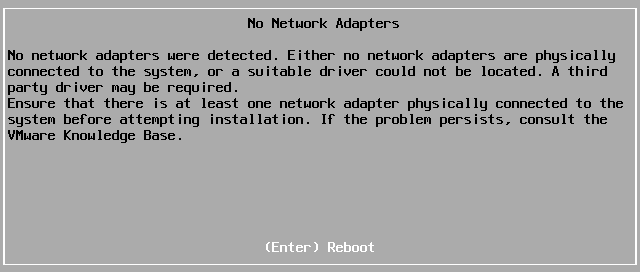
6.7 이더라도 호환이 안되는 Realtek 네트워크 카드가 연결된 PC에서 설치를 진행하면 그림과 같은 화면이 나오면서 중단 된다.

그래서 Realtek 드라이버를 밀어 넣은 설치 ISO 파일을 만들어서 사용해야 한다.
0. 작업용 폴더 생성
작업에 필요한 파일들을 하나의 폴더에 정리해 놓기 위해서 폴더를 하나 만든다.
이 글에서는 C:\ESXi67 폴더를 만들어서 사용하는 것을 기준으로 설명한다.
1. 드라이버 다운로드
아래 URL에 접속해서 아래쪽에서 Offline Bundle of version 8.045a를 C:\ESXi67 폴더에 받아 놓는다.
- 드라이버 정보 : https://vibsdepot.v-front.de/wiki/index.php/Net55-r8168
- 드라이버 직접 다운로드 : http://vibsdepot.v-front.de/depot/bundles/net55-r8168-8.045a-napi-offline_bundle.zip
2. ESXi-Customizer-PS-v2.6.0.ps1 다운로드
드라이버를 ESXi 설치용 ISO 파일에 밀어 넣어서 만들어주는 ESXi Customizer라는 스크립트가 있다. 아래 URL을 접속해서 접속해서 ESXi-Customizer-PS-v2.6.0.ps1를 C:\ESXi67 폴더에 받아 놓는다.
- 프로그램 정보 : https://www.v-front.de/p/esxi-customizer-ps.html#download
- 직접 다운로드 : http://vibsdepot.v-front.de/tools/ESXi-Customizer-PS-v2.6.0.ps1
3. PowerShell 실행 및 기본 설정
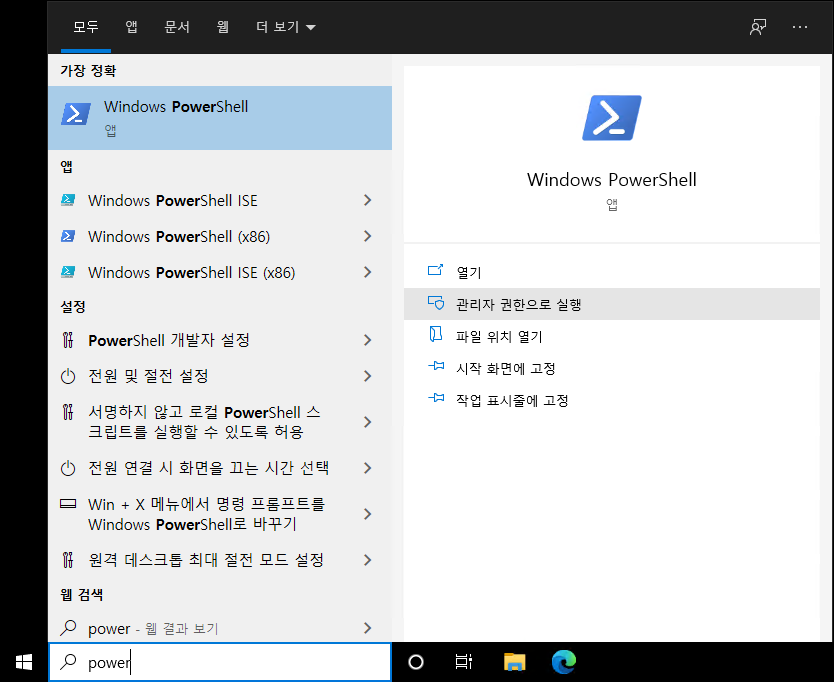
윈도우 시작 메뉴에서 PowerShell을 관리자 권한으로 실행한다.

PowerShell 창에서 “Set-ExecutionPolicy -ExecutionPolicy Unrestricted -Scope CurrentUser” 명령을 이용해서 실행 관련 권한을 Unrestricted로 설정한다. 변경하겠냐고 물으면 “Y”를 입력한다.
PS C:\ESXi67> Set-ExecutionPolicy -ExecutionPolicy Unrestricted -Scope CurrentUser

실행 규칙 변경
실행 정책은 신뢰하지 않는 스크립트로부터 사용자를 보호합니다. 실행 정책을 변경하면 about_Execution_Policies 도움말 항목(https://go.microsoft.com/fwlink/?LinkID=135170)에 설명된
보안 위험에 노출될 수 있습니다. 실행 정책을 변경하시겠습니까?
[Y] 예(Y)  [A] 모두 예(A)  [N] 아니요(N)  [L] 모두 아니요(L)  [S] 일시 중단(S)  [?] 도움말 (기본값은 "N"): Y

PS C:\ESXi67>
“Install-Module -Name VMware.PowerCLI -AllowClobber” 명령으로 PowerCLI 모듈을 설치한다. 중간에 NuGet 공급자 관련, 리포지토리 관련해서 묻는 부분이 나오면 “Y”를 입력한다.
PS C:\ESXi67> Install-Module -Name VMware.PowerCLI -AllowClobber                                                                                                                                                                                                                                                                                              계속하려면 NuGet 공급자가 필요합니다.                                                                                                                                               NuGet 기반 리포지토리를 조작하려면 PowerShellGet에 NuGet 공급자 버전 '2.8.5.201' 이상이 필요합니다. 'C:\Program Files\PackageManagement\ProviderAssemblies' 또는                    'C:\Users\ikhwan.koo\AppData\Local\PackageManagement\ProviderAssemblies'에서 NuGet 공급자를 사용할 수 있어야 합니다. 또한 'Install-PackageProvider -Name NuGet -MinimumVersion
2.8.5.201 -Force'를 실행하여 NuGet 공급자를 설치할 수 있습니다. 지금 PowerShellGet에서 NuGet 공급자를 설치하고 가져오시겠습니까?
[Y] 예(Y)  [N] 아니요(N)  [S] 일시 중단(S)  [?] 도움말 (기본값은 "Y"): Y

신뢰할 수 없는 리포지토리
신뢰할 수 없는 리포지토리에서 모듈을 설치하는 중입니다. 이 리포지토리를 신뢰하는 경우 Set-PSRepository cmdlet을 실행하여 InstallationPolicy 값을 변경하십시오. 'PSGallery'에서
모듈을 설치하시겠습니까?
[Y] 예(Y)  [A] 모두 예(A)  [N] 아니요(N)  [L] 모두 아니요(L)  [S] 일시 중단(S)  [?] 도움말 (기본값은 "N"): Y
PS C:\ESXi67>
4. 준비 상태 확인
ISO 파일을 생성하기 전에 그림과 같이 C:\ESXi67 폴더에 2개의 파일 잘 있는지 확인한다.

5. Realtek 드라이버 넣기 진행
“.\ESXi-Customizer-PS-v2.6.0.ps1 -v67 -ozip -pkgDir c:\esxi67” 명령으로 ESXi Customizer를 실행한다. 상황에 따라 5~10분 정도 시간이 걸린다.
중간에 노란색으로 나오는 글자들은 CEIP 참여 여부와 관련된 부분이다. 크게 신경쓸 필요 없다.
PS C:\ESXi67> .\ESXi-Customizer-PS-v2.6.0.ps1 -v67 -ozip -pkgDir c:\esxi67

This is ESXi-Customizer-PS Version 2.6.0 (visit https://ESXi-Customizer-PS.v-front.de for more information!)
(Call with -help for instructions)

Logging to C:\Users\ikhwan.koo\AppData\Local\Temp\ESXi-Customizer-PS-1964.log ...
경고: Please consider joining the VMware Customer Experience Improvement Program, so you can help us make PowerCLI a better product. You can join using the following command:

Set-PowerCLIConfiguration -Scope User -ParticipateInCEIP $true

VMware's Customer Experience Improvement Program ("CEIP") provides VMware with information that enables VMware to improve its products and services, to fix problems, and to advise
 you on how best to deploy and use our products.  As part of the CEIP, VMware collects technical information about your organization뭩 use of VMware products and services on a
regular basis in association with your organization뭩 VMware license key(s).  This information does not personally identify any individual.

For more details: type "help about_ceip" to see the related help article.

To disable this warning and set your preference use the following command and restart PowerShell:
Set-PowerCLIConfiguration -Scope User -ParticipateInCEIP $true or $false.

Running with PowerShell version 5.1 and VMware PowerCLI version 12.0.0.15939655

Connecting the VMware ESXi Online depot ... [OK]

Getting Imageprofiles, please wait ... [OK]

Using Imageprofile ESXi-6.7.0-20200604001-standard ...
(dated 06/04/2020 02:20:40, AcceptanceLevel: PartnerSupported,
No Doc)

Loading Offline bundles and VIB files from c:\esxi67 ...
   Loading C:\esxi67\net55-r8168-8.045a-napi-offline_bundle.zip ... [OK]
      Add VIB net55-r8168 8.045a-napi [New AcceptanceLevel: CommunitySupported] [OK, added]

Exporting the Imageprofile to 'C:\ESXi67\ESXi-6.7.0-20200604001-standard-customized.zip'. Please be patient ...


All done.

PS C:\ESXi67>
6. 파일 생성 확인
dir 명령으로 ESXi-6.7.0-20200604001-standard-customized.zip 과 같은 파일이 잘 만들어졌는지 확인한다. 이 파일이름은 6.7이 업데이트되면서 달라질 수도 있다.
PS C:\ESXi67> dir

    디렉터리: C:\ESXi67

Mode                 LastWriteTime         Length Name
----                 -------------         ------ ----
-a----      2020-08-17   오후 5:52      342331150 ESXi-6.7.0-20200604001-standard-customized.zip
-a----      2020-08-17  오전 11:21          21003 ESXi-Customizer-PS-v2.6.0.ps1
-a----      2020-08-17  오전 11:23        1131668 net55-r8168-8.045a-napi-offline_bundle.zip

PS C:\ESXi67>
7. ZIP 파일을 ISO 파일로 변환
설치용으로 사용하기 위해서 앞단계에서 생성된 ZIP 파일을 ISO 파일로 변환한다. 1분 정도 걸리는 것 같다.
PS C:\ESXi67> .\ESXi-Customizer-PS-v2.6.0.ps1 -izip .\ESXi-6.7.0-20200604001-standard-customized.zip

This is ESXi-Customizer-PS Version 2.6.0 (visit https://ESXi-Customizer-PS.v-front.de for more information!)
(Call with -help for instructions)

Logging to C:\Users\ikhwan.koo\AppData\Local\Temp\ESXi-Customizer-PS-1964.log ...

Running with PowerShell version 5.1 and VMware PowerCLI version 12.0.0.15939655

Adding base Offline bundle .\ESXi-6.7.0-20200604001-standard-customized.zip ... [OK]

Getting Imageprofiles, please wait ... [OK]

Using Imageprofile ESXi-6.7.0-20200604001-standard-customized ...
(dated 06/04/2020 02:20:40, AcceptanceLevel: CommunitySupported,
No Doc (customized))

Exporting the Imageprofile to 'C:\ESXi67\ESXi-6.7.0-20200604001-standard-customized.iso'. Please be patient ...


All done.

PS C:\ESXi67>
8. 다시 파일 확인하고, 설치하러 고고~
dir 명령으로 ISO 파일이 잘 생성되었는지 확인한다.
PS C:\ESXi67> dir

    디렉터리: C:\ESXi67

Mode                 LastWriteTime         Length Name
----                 -------------         ------ ----
-a----      2020-08-17   오후 5:56      353040384 ESXi-6.7.0-20200604001-standard-customized.iso
-a----      2020-08-17   오후 5:52      342331150 ESXi-6.7.0-20200604001-standard-customized.zip
-a----      2020-08-17  오전 11:21          21003 ESXi-Customizer-PS-v2.6.0.ps1
-a----      2020-08-17  오전 11:23        1131668 net55-r8168-8.045a-napi-offline_bundle.zip

PS C:\ESXi67>
이제 이 ISO 파일을 Rufus 같은 프로그램을 사용해서 USB 기록하고 설치하면 된다.
Realtek LAN 칩셋이 장착된 메인보드에서도 마음편히 설치할 수 있다.
참고
다른 글들에는 조금 다른 방식으로 설명되어 있다. 그러나 WinError 10054 발생을 방지하고 안전하게 진행하기 위해서 위와 같은 방법으로 진행한다.
참고
나중에 PowerCLI를 사용할 거라면 다음 명령을 실행해 놓으면 편하다.
Set-PowerCLIConfiguration -Scope User -ParticipateInCEIP $false
Set-PowerCLIConfiguration -InvalidCertificateAction Ignore


1 comment
덕분에 Realtek 기반의 Esxi ISO 파일을 잘 구성했습니다. 정말 감사합니다.